- High quality
- Outstanding service
- Our production
- World wide delivery
- Unique design
- All kits included
Attention
What you see now is what we are going to print. Please check carefully before adding your product to cart.
...
MEASURING FOR WALL MURAL
RECOMMENDED TOOLS
![]()
![]()
![]()
PREPARATION
Make sure the surface is smooth and clean.Remove any old paint or murals that are coming off.Clean the surface
with warm water and apply filler where necessary. If the surface is damaged, apply a primer coat or pre-paste before
hanging murals. You should also prime the surface if it has bright colors as they could show through the wall mural.
Prepare the paste – it was shipped to you with your order free of charge. Please read the instructions carefully before using.
HOW WIDE OUR WALL MURAL ROLLS?
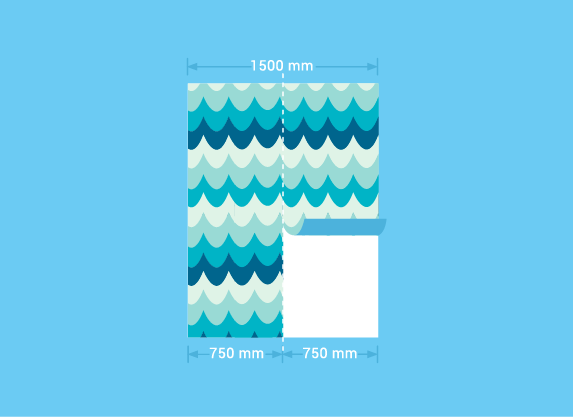
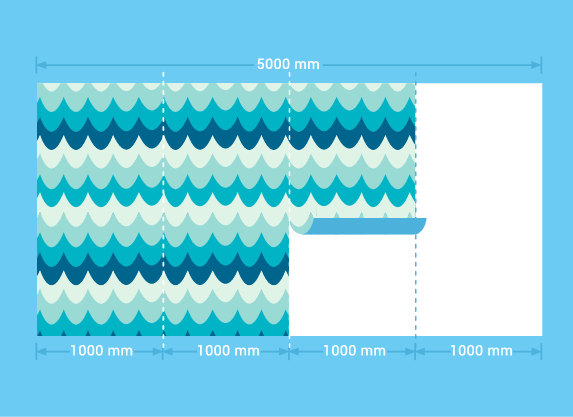
We devide our murals into equal parts. For example: if your image is 1500 mm width, we divide it in two panels of 750 mm each in width. If you have larger walls and you need bigger image, for instance, 5000 mm, so we would divide it into five panels of 1000 mm each in width.
Maximum wall mural panel width – 1000 mm.
![]()
WALL MURAL INSTALATION INSTRUCTIONS
WALL PREPARATION


Step 1. Make sure the surface is smooth and clean.Remove any old paint or murals that are coming off. Clean the surface
with warm water and apply filler where necessary. If the surface is damaged, apply a primer coat or pre-paste before
hanging murals. You should also prime the surface if it has bright colors as they could show through the wall mural.
Step 2. Prepare the paste – it was shipped to you with your order free of charge. Please read the instructions
carefully before using. Apply the paste directly on the mural. Use a roller or a brush. It’s important to cover
the whole area with paste. After pasting mural leave it to soak for a period of 5-10 minutes.
HANGING
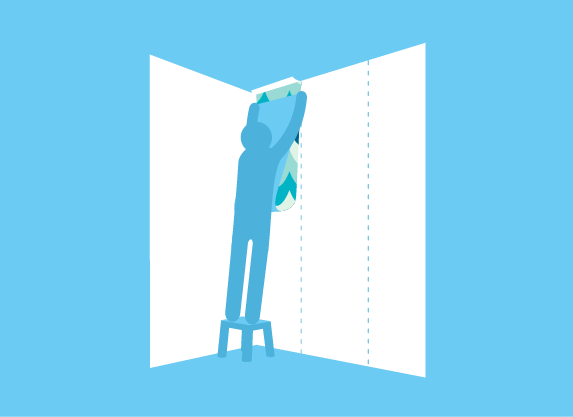
Step 1. Before hanging, make sure none of the mural panels are missing and there are no defects or damage.
Start by hanging them from left to right. Make sure the panels are hung straight. It is vital that the
first panel is hung straight. Draw vertical markings on the wall using a spirit level, a measuring tool
and a pencil. Use markings as a guide to hang the first panel.
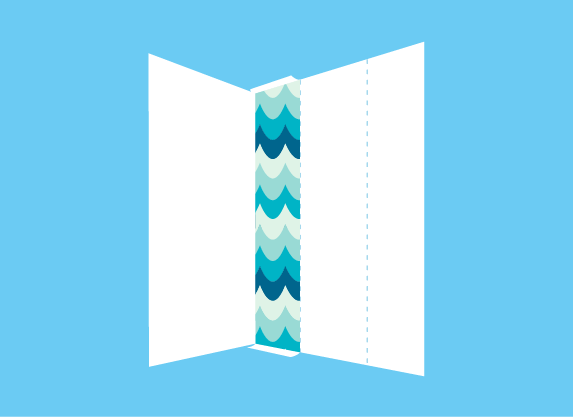
Step 2. Hang the panels edge to edge. The panels should not overlap. Take care to press the panels together
firmly at the seams. For the best result use a seam roller. Be careful to match up the pattern with the
next panel and avoid getting wall mural paste on the front of the mural as this will show when it dries.
NOTE: Avoid harsh folds as this may cause cracks in the print.
Step 3. Smooth down the panels from ceiling to floor. Use your hands or wall mural brush, starting from
the middle and smoothing out towards the edges. Any small bubbles and folds will disappear once the
mural has dried. If there are any spots of the paste on the front of the mural, use a damp cloth or
sponge to remove them, but avoid rubbing.
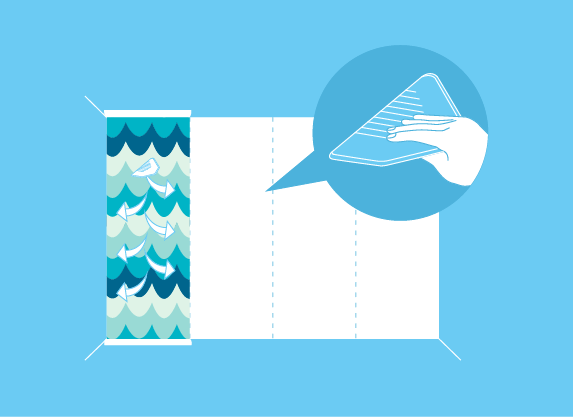
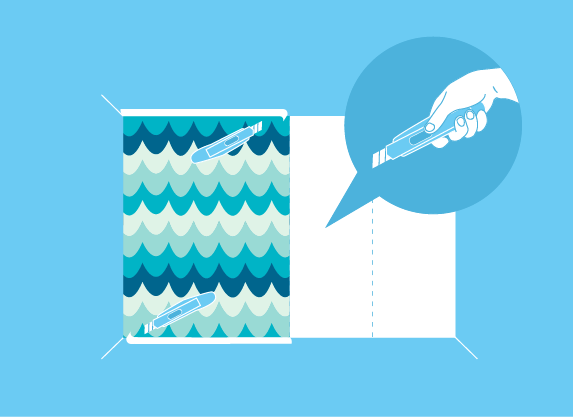
Step 4. Remove the excess paper top and bottom with razor knife. Then sit back and enjoy your new wall murals!
ROLLER BLINDS MEASURING INSTRUCTIONS
RECOMMENDED TOOLS
![]()
![]()
![]()
PREPARATION
Look at your window handles and tiles. Decide where you want your blinds to hang:
On the inside of your window (this is called recess)
On the outside of the window (this is called exact fitting).
Recess ( inside on the window)

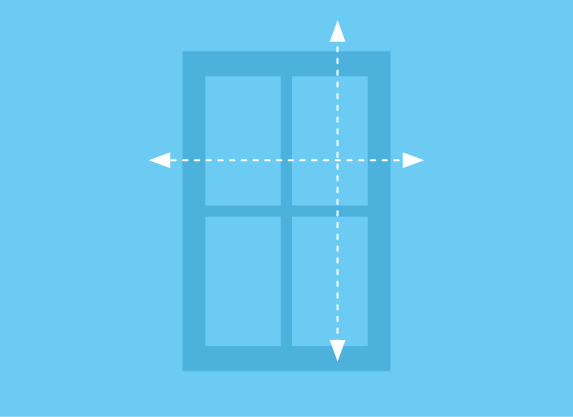
Step 1. Measure the width of the inside of the window from wall to wall in the 3 places. Write down the shortest measurement.
Step 2. Measure the length of your blind in the 3 places shown below. The length is the measurement from the top of the window
to the window sill. Write down the shortest measurement.
Exact fitting ( outside the window)
Step 1. Decide what distance you would like your blind to extend beyond the left and right of your window, then measure the
distance between these two points. Write down this measurement (width).Step 2. Decide precisely how high above the window you
would like your blind to be fixed and measure down to exactly where you would like it to finish. This may beto the floor or
to the window sill. This measurement is called the drop. Write down this measurement.
Note: roller mechanism adds 4 cm to the width of the blind. For example: If your window is 100 cm in width, it means
that your printed image has to be 96 cm as the mechanism takes up 4 cm (like blind’s margins).
Always double check your measurements before ordering!
![]()
RECOMMENDED TOOLS
![]()
![]()
![]()
![]()
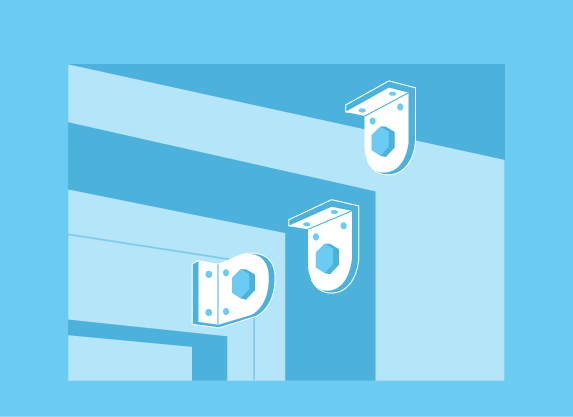
Firstly, check you’ve got all the fittings that came with your roller blind. Your brackets are packed separately in the box.
Please ensure you’ve located them before disposing of the packaging. The brackets are a universal type that can be used
to top fix the blind into recess or face fix into a frame or wall. Please read the following instructions carefully
before you start fitting your blind.
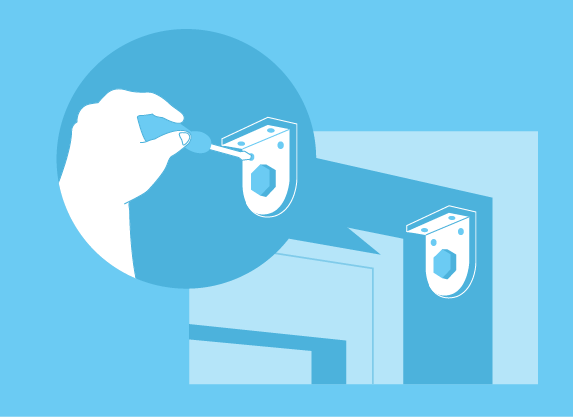
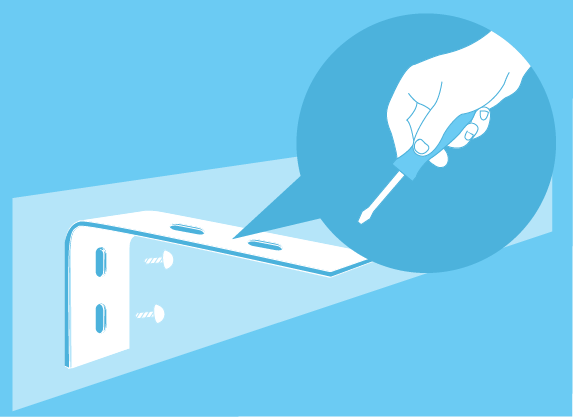
Step 1. Mount the brackets on the window frame or wall. Measure the points where your brackets will be screwed on either side.
Ensure the brackets are positioned a suitable distance away from any window handle or obstructions to allow the blind to
operate smoothly. Hold the bracket in place and pre-drill the screw holes. Then use the impact driver to screw the brackets in.
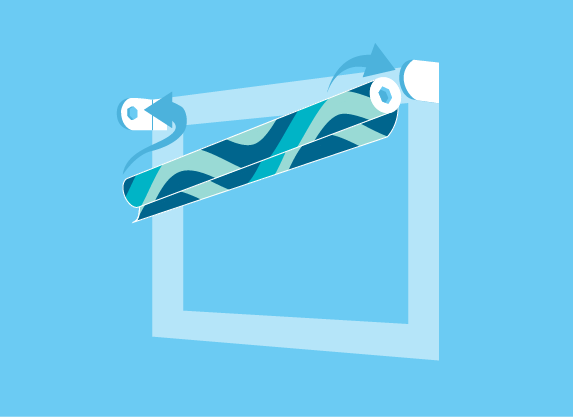

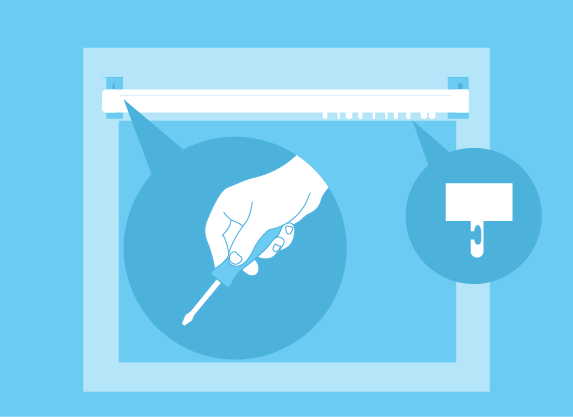
Step 2. Install the roller blind on the wall frame or wall. Mount the rolled up roller blind into the brackets.
Once the blind is in place, secure the sash cord’s controlbracket to the window frame. The sash cord raises and lowers the blind.
Step 3. Enjoy your new roller blinds. Once you’ve installed your roller blind, make sure it works smoothly,
sit back and enjoy your new blinds!
VERTICAL BLINDS MEASURING INSTRUCTIONS
RECOMMENDED TOOLS
![]()
![]()
![]()
PREPARATION
Look at your window handles and tiles. Decide where you want your blinds to hang:
On the inside of your window (this is called recess)
On the outside of the window (this is called exact fitting).
Recess ( inside on the window)
Step 1. Measure the width of the inside of the window from wall to wall in the 3 places. Write down the shortest measurement.
Step 2. Measure the length of your blind in the 3 places shown below. The length is the measurement from the top of the window
to the window sill. Write down the shortest measurement.
Exact fitting ( outside the window)
Step 1. Decide what distance you would like your blind to extend beyond the left and right of your window, then measure the
distance between these two points. Write down this measurement (width).Step 2. Decide precisely how high above the window you
would like your blind to be fixed and measure down to exactly where you would like it to finish. This may beto the floor or
to the window sill. This measurement is called the drop. Write down this measurement.
Note: roller mechanism adds 4 cm to the width of the blind. For example: If your window is 100 cm in width, it means
that your printed image has to be 96 cm as the mechanism takes up 4 cm (like blind’s margins).
Always double check your measurements before ordering!
![]()
RECOMMENDED TOOLS
![]()
![]()
![]()
![]()
First check you’ve got all the fittings that come with your vertical blind. Your brackets are packed separately in the box.
Please ensure you’ve located them before disposing of the packaging. The brackets are a universal type that can be used
to top fix the blind into recces or face fix into a frame or wall. Please read the following instructions carefully
before you start fitting your blind.
Step 1. Mount the brackets on the window frame or wall. Measure the points where your brackets will be screwed on either side.
Ensure the brackets are positioned a suitable distance away from any window handles or obstructions to allow the blind to
operate smoothly. Hold the bracket in place and pre – drill the screw holes. Then use the impact driver to screw the brackets in.


Step 2. Pull the chain to rotate the openings in the stems so they face you. Attach the first vane by gently sliding it
up into the plastic stem until it snaps into place. Repeat until all vaes are attached. To complete your installation,
install the safety bracket to keep the cord fairly tight. Finish by testing your new blinds. Carefully pull down on
the cord to slowly open your blinds, then pull the cord to completely close them.
Step 3. Enjoy your new vertical blinds. Once you’ve installed your vertical blind, make sure it works smoothly,
sit back and enjoy your new blinds!
Choose type
Wall murals Roller blinds Vertical blinds


Product Details
Shipping info: 8-15 work days
Payment: PayPal, Visa, MasterCard, Maestro
Material options:
Our wall murals are made of PVC coated non-woven fabric with embossing.
- Murals are created only for indoor decoration. The characteristics
of the non-woven murals:
- Finish: Matte
- Brilliant colour reproduction
- Good flatness
- Softness
- Height 100 - 500 cm (39 - 197 inch)
- Width 100 - 1000 cm (39 - 394 inch)
How to Measure & Instal: Click here